Do you want to set up a feedback form on your own? Just follow these steps:
Go to 'Data collection' on the left-hand side of the page and click on 'Feedback forms'.

If you haven't made any feedback forms yet, an empty page with just one option 'New form' will appear, click on this. Then, choose what type of form you want to create.
See Differences Feedback Form Types for the differences between the form types Responsive Feedback Form for Web, Email Campaign Feedback Form and In-App Mobile Feedback Form. |
Next, choose if you want to use a template, or start from scratch. Note, that, currently, only templates for web forms are available.

If you want to use a template, you will be using predefined templates for your feedback form. An example of this would be the GCR template which analyses the Goal Completion Rate of your organization. We have many templates to choose from.
To read more about feedback forms using the "Pick a template" option please read this article.
The first step is to give your feedback form a name, you can do this by clicking on the pencil button, at the top of the page.

Now you will see a screen with a lot of options along. On the right, you will see ‘Add', ‘Block', 'Logic’, 'Form’ and 'Templates'. Click on 'Add' to choose your score elements and question elements. Once you've made your choice, just drag and drop your element on your empty template.

Have a look at Building Elements to get more information on the different elements. |
If you've made the incorrect selection in regards to the question elements you have selected, you can easily delete a question element by clicking on the 'Trash' icon to the right of your question element.

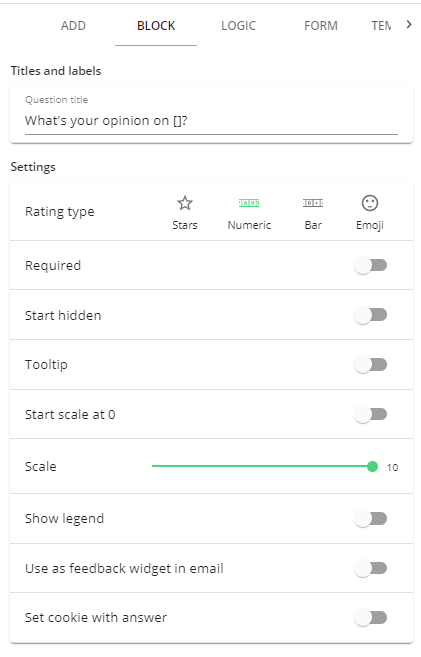
You can also edit your questions. For example, the text and answer options of the question. Just click on the 'Block' button on the right and click on a question element.

Required questions: If you want it to be mandatory for your users to fill in an answer to a certain question, click on the question element and then click on the ‘Required' button on the right-hand side. If you've selected the 'Required' button, your questions will be marked by a '*’, indicating that it is now a required question.


You can also decide to hide your questions when the feedback form loads. If you've selected the ‘Start hidden' button, an icon with an eye and 'Starts hidden’ will appear below your question element. (Don't forget to show the question based on question routing, for example, when a user selects a low score in a previous question. See step 10.)


A tooltip is an additional option available that allows you to give your respondent a tip or an explanation to a question when the feedback form loads on the website. Just fill in your text and your question will be marked with a 'question mark' icon.


'Logics' are very valuable when creating a feedback form because one particular answer can lead you to another question that is connected to the previous question. Here is an example of the follow-up question when the respondent clicks on 'Yes'.

To apply this in your logic settings click on the blue ‘(+) Add logic’ button, under ‘LOGIC’ on the right-hand side. If you haven't saved your feedback form yet, do so by clicking on the green 'Save' button at the top of your feedback form.
Now you will see a screen to set up your logic for the question you've selected.

Here, the logic has already been filled in. You can see that if the respondent clicks on 'Yes', the 'How much effort did it take you to achieve your goal?' question will appear as the next question. Make sure the 'How much effort did it take you to achieve your goal?' question is hidden by your settings so that this question is invisible in other instances.
Your form has a built-in ‘Thank you' page with a default text. If you would like to change this click on the 'Thank you for your feedback’ element. Under 'BLOCK' you can edit your own text.

Are you done adding questions to your feedback form?
Don't forget to save your form, by clicking on ‘SAVE’ in the top right corner.
Now it's time to set up the deployment and place the Mopinion code (tag) on your website and start collecting that valuable feedback!
To implement the feedback form on your own website we recommend that you read the article on deployment and the articles on placing tags. Tags can be placed with Google Tag Manager or by implementing the Mopinion script.
To find out how form logics work to skip questions, please read this article.
Tip: When you're finished creating your feedback form and have saved it, you can view a preview of the form by clicking on the blue 'eyeball' icon at the top right of the page. |
