Why an embedded form on your FAQ page?
You receive data on your FAQ page
An easier way to know if you need to change anything in your FAQ page
Embedded is the most seamless way to ask for feedback on an FAQ page
Setup
Step 1: Create an embedded form
Edit the form and set it to Embedded in the form tab in the build step:
Step 2: Add form to deployment
Then go to the deployments and add the form to the deployment and leave the trigger method at ‘Triggered by button’:
Step 3: Edit the form placement options
Scroll down to view the form placement options. For embedded forms it’s important to edit these. Turn off the toggle for ‘Append div to body of the page if not found’. If this toggle is on and the settings on the website are incorrect the form will be placed at the bottom of the page. This is probably the incorrect position.
Step 4: Choose a selector
Then at the “Render form into” option choose a name for the selector you want to use to specify the location of the form on the page. For FAQ pages there should be multiple forms on a single page. If you use multiple forms a class is used as the CSS selector. In this example, we will use .survey-content-embed. Lastly, toggle the ‘Append form to all of selector’ option.
Step 5: Set the correct conditions
Then, also set the other conditions relevant to your form and save the deployment.
Step 6: Show the form on the FAQ page
To show the form on the FAQ page you have to add a div with the chosen selector. In this case the div will be the following: <div class=”survey-content-embed”></div>.
Place this div underneath each question on the FAQ page. Now the forms will be triggered once you reload and clear the cache.
Step 7: Link FAQ question title to the form
The last step is to add the FAQ question title or other question specific information to the feedback. To do this we use the website data element. Edit the form and add the website data element:
As a source, you can either use a Data attribute or use the CSS selector. By default, both these options select the first value from the first occurrence of that selector or Data attribute on a page. This means that for a setup on an FAQ page, where usually multiple instances of the same selectors are present, only adding a CSS selector would always return the first one.
Selecting the matching FAQ element
To ensure that the correct question data is sent along with the feedback you can add {{FORM_DIV}} to the start of the selector. This will use the currently used survey as a starting point, it will then look for the closest parent of that survey that matches the selector used in the website data element.
| Note |
|---|
Important: use '{{FORM_DIV}}' as part of the selector, ( for instance {{FORM_DIV}}.faq-formtitle ), else the first instance found on the website is used, instead of the instance closest to the particular form. |
Example
Below is an example of an FAQ list (ul) with list items (li), a class called faq-box and a data attribute called [data-question]. The title of each question is in a div with the class plaintext. We have added a div with the class survey-content-embed to each question so we can record feedback on each specific question.

We want to collect the text of the div with the class plaintext. To do this we the following rule {{FORM_DIV}} .faq-box .plaintext in the website data element.

This will use the .survey-content-embed from the current form and look for the first parent element that matches .faq-box and then select the value of .plaintext.
When a user now sends feedback for faq form 3, the corresponding title is sent along:
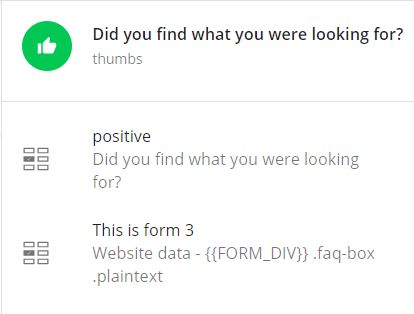
In our example set-up, there is also a data attribute available that has the same data as the text in the h3 element. We could also opt to collect this value. Because this data attribute is present on the parent of .survey-content-embed, adding {{FORM_DIV}} [data-question] as an option to the website data element is enough to collect this value in this example:

| Easy html macro | ||||
|---|---|---|---|---|
| ||||